You’ve picked your party from part 1 and are ready to go.
Now… where to go? What should you take with you? And who are you taking?
Items

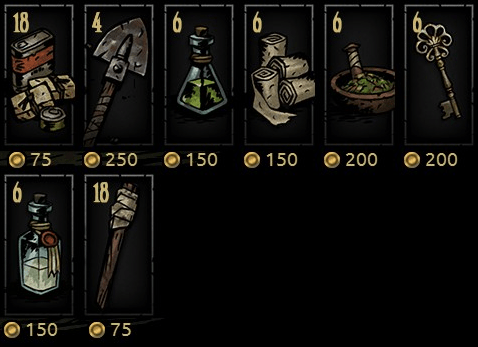
From what I’ve seen, there are 10 possible items that your party can take with it. Each item can be purchased from the Caretaker, once you’ve picked your party and hit the “Embark!” button:
- Food – this item is crucial. You gain health from eating food; each character usually eats 1 food unit (unless Stress changes that…). When Hunger strikes, or when your party Camps, you also eat Food to recover. Take at least 8 food units per quest, unless you have a pretty strong Vestal.
- Torch – another crucial item. Torches provide light (minimizing Stress from fighting in the dark); light prevents Surprise Attacks, and helps you make Surprise Attacks. Some areas (The Ruins) need more torches than others (Weald).
- Shovel – used to clear out barriers. One or 2 shovels are all that I’ve needed, so far.
- Bandages – have a few of these on hand, at all times. They stop bleeding… and you will bleed A LOT.
- Antivenom – this is one that you could possibly leave at home. Unless you are in The Weald. If you are, take 3 or 4 – too many chances to get Poisoned and/or Blighted.
- Medicinal Herbs – these will prevent some of the things that Antivenom cures. It’s not as required as Bandages but you should probably have a couple on hand, if you have the gold and room for them.
- Skeleton Key – I have yet to use one of these. I’m guessing you will use them in higher-level encounters. For now, leave them at home for your first few dungeon adventures
- Holy Water – purges evil and evil effects. Definitely should have 3-5 units in the Ruins; everywhere else, meh.
In addition, Firewood (for Camping) and Dog Treats (for the Houndmaster) are available: Firewood is given freely, Dog Treats are given if you take the Houndmaster.
Locations

The Ruins
The Ruins are the first area you can explore. They are infested with the undead, lead by a group of Necromancers. Undead cannot bleed. Undead CAN be Blighted. I’d suggest taking characters that can cause Blight damage. They also have two VERY dangerous (to lower-level characters) enemies: the Madman and the Bone Courtier (it’s usually wearing a velvet-looking outfit and holding a goblet). Both of these characters don’t hit for much physical damage but will wreck a character’s Stress levels with their attacks. The madman is particularly dangerous, in that one of his attacks can hit ALL of your party for 10-25 Stress per attack. Deal with those two enemies first!
As for the Necromancers… you’ll run into one, once you have made a few runs through the Ruins. I have only seen him once and got my butt handed to me. Necromancers can bleed, plus they can be stunned. Do as much of both to him as possible per turn. I was not prepared for the Necromancer; I will be next time.
The Weald
The Weald is an overgrown, diseased-ridden forest, surrounding the road to the Hamlet. It is full of Fungi, Ectoplasms, Spiders, and who knows what other creatures that like to disease and poison you (if you ever played Baldur’s Gate II, and dealt with the Spore Colonies and Myconids, then you have an idea of what these Fungi can do). Bring extra Shovels (there are plenty of overgrowth barriers), Bandages, and Antivenom for the early levels. Bring a Holy Water, if you have the inventory room.
I have not explored The Weald much, yet. I do know that the Fungal Scratcher could be a problem: it Marks you for higher damage, plus could cause an illness with its attacks.
The Warrens
The Warrens are a group of tunnels and aqueducts, taken over by a nasty group of enemies known as the Swine. There are also Carrion Eaters, Maggots, and even some Cultists. The collective group can cause disease, bleed, moderate amounts of Stress, and generally lead to a bad day at the office. Be particularly aware of the Swine Drummer and Swine Wretch: they spend their times at the back of the formations, hitting either the whole party with a scary amount of Stress (Drummer) or a single character with a Stress/Disease combo (Wretch).
Bring Bandages and Medicinal Herbs. You will need them. Your Vestal and/or other healing characters will thank you later.
The Cove
The Cove is the 4th area that you can explore early. It is the home of Fish-Men, sea creatures, and other water(logged)-based creatures. Most are partially resistant to bleed but are very vulnerable to Blight (looking at YOU, Plague Doctor). Stun attacks seem to be pretty effective, also.
Bring an extra shovel or 2. Bring an extra Medicinal Herb or 5.
The Darkest Dungeon
I don’t know exactly when this area unlocks; I’m guessing when the other 4 areas reack Level 6.
Part 3 will list the 15 character classes, plus a general wrap-up and overall review.

2 thoughts on “Review: “Darkest Dungeon”, Pt. 2 – “GO! FIGHT! Die. Win…?””